No phones except for classwork.
No earbuds or headphones for music. Use for classwork only.
Do not listen to music in the classroom.
Today:
•In Notes........
•Load portrait photo or self portrait photo on computer
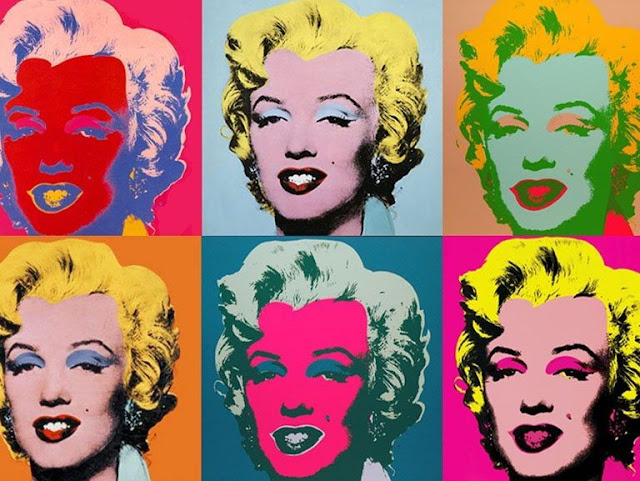
•Apply filters in Photoshop to create image such as Andy Warhol's "Marilyn" series.

Standards:
CREATE PRODUCE RESPOND CONNECT
Create
1. Generate and conceptualize artistic ideas and work.
2. Organize and develop artistic ideas and work.
3. Refine and complete artistic work.
Produce
2. Develop and refine artistic work for production.
Connect
1. Synthesize and relate knowledge and personal experiences
to artistic endeavors.
2. Relate artistic ideas and works with societal, cultural,
and historical context.
Together:
Open Photoshop
Go to Window>Essentials
Check Layers, Application Frame, Tools, Options
Go to File>New
Name: Your first and last name_Portrait with filters
Width: 16 inches (be sure it reads inches)
Height: 12 inches
Resolution: 200
Color Mode: RGB
Background contents: White
Click OK
Go to File>Save As
Where: Your documents folder
Format: Photoshop
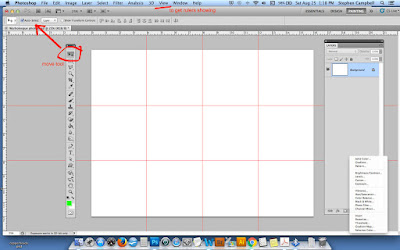
Go to the Move Tool and check Auto Select:Layer
Go to View and check Rulers
In the Rulers Bar, click hold and drag guide lines to mark off 4 inch sections

NOW..........Open your portrait photo
•Go to Image>Mode>Grayscale
•On the layers palette, make a copy of the background layer by pressing command+j
•Click once on the background layer eyeball to turn it off
•Select the layer above the background layer
•Go to Filter>Artistic>Cutout
•Start off with Number of Levels>4, Edge Simplicity>3, Edge Fidelity>2, but change for the effect you like best
•Click OK
•Save it as a JPEG onto your desktop
NOW go to your original Photoshop document (Portrait with Filters)
•Use the rectangular selection tool and drag it to select one of the squares. You should see marching ants.
•Go to File>Place Embedded and click on the JPEG image you have placed on your desktop.
•Resize it to fit the space. Edit>Free Transform. Click and hold Shift while you drag from a corner.
•Go to Layer>Rasterize Layer
•Cut out any extra image area by using the Rectangular Selection Tool
•At the Selection Tool, go to Select>Inverse
•Press delete
•Select>Deselect
• Make copies of the image just finished. Select the Move Tool. Click and hold+the option key. Drag to position you want.
NOW
•Color images using mostly the Paint Bucket Tool
NOTE: Be sure you are on the layer you want to color or digitize.
•If you want to add a stroke or pattern, you need to do that with Edit>Stroke or Edit>Pattern

Assessment:
20 points each
1. Specifications (size, resolution, color mode, typography)
2. Tools used correctly
3. Document saved correctly
4. Correct quantity and type of images
5. Digital effects applied correctly
No comments:
Post a Comment